How To Guides for the Vaio F Series: |
Clean Install using the
OEM Recovery Discs |
Calibrate the Monitor |
Replace the Display
and/or the Inverter |
Replace The
Keyboard or Clean the Fan |
Add a
Secondary Hard Drive |
Replace the Main Hard
Drive | VAIO
F Series Disassembly Guide - Teardown |
3rd Party
Battery: $70/4 hours Battery Life!
![]()
Vaio F Series Laptop How To Replace the LCD Display & Inverter
|
Linking to this page: if you can, please use keywords in your links to help search engines results & use the normal URL found in the status bar of your browsers. Exception: forum.notebookreview.com (NBR) broke all links to the How-To articles hosted on this site by breaking all links starting with monteverde.org. If you want to link to this page on NBR, copy, paste & post this as a workaround: [URL="http://tinyurl.com/256h9py"]Vaio_F Series How To Replace the LCD Display & Inverter[/URL] Note: if you don't put an underscore between comercial words like Vaio F or F Series or Acer, etc, then NBR automatically parse the words with links to their coupons pages & break the intended links. Hence the Vaio_F. I can't do individual support (except for longtime F
owners friends) but if
you want to write to make suggestions or comments about this page or
just say Hello or thanks, please write to:
All the Vaio F content found here is in the process of being moved to this new dedicated mini-site: www.vaiofseries.com |
Updated 2012-09-18: link added.
Well, it turns out that removing the Vaio VPCF's LCD is a little bit more
work than shown in this
How-to LCD Removal video you can find on Youtube.
The main difference is that the Vaio VPCF has these awesome hinges that pushes
back & lowers the display when the lid is opened. There are only 4 screws
fastening the display's front bezel but the lower ones are a PITA to remove &
the bottom part of the bezel is not easy to unsnap & pull out because of the
narrow wiggle room. Here is
an other tutorial where he removes the hinges and the entire cover
wich makes removing the bezel easier but he also removes other stuff not
really necessary for a LCD replacement like keyboard, speakers, WIFI &
Bluetooth cables, etc.
It took me about 30 minutes to remove the display being extra careful. Just
reverse the steps to put back in place the LCD & everything else.
Tools: magnetized small
Phillips
screwdriver (crosshead). Magnetized because it's much easier to extract from
deep holes & reset the small screws w/o dropping them. Also two small jeweler's
flat screwdrivers or two long safety pins or similar and optional small tweasers.
Warnings:
- Never touch a circuit or electrical contacts with the magnetized screwdriver's
point.
- Do not apply any strong localized pressure nor hit the exposed surface of the
display.
- There are many tabs & hooks on both the speakers cover & display bezel. When
unsnapping them if you use force instead of patience & break some of these tabs,
the parts may not fit flush or secured after re-assembly.
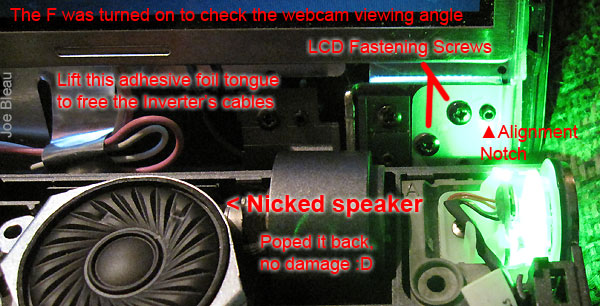
- The exposed speakers are very easy to nick or destroy. I suggest covering them
with a piece of cardboard or small plastic lid covers.
- Sort removed screws by steps as they have different lenght, use paper note if
you have a short span memory.
- As they say in USA: this coffee is hot and the floor is slippery and don't sue
us if you try this DIY & mess up something in your notebook as you were warned:
use this how-to guide @ your own risk.

- Don't work over a shaggy rug as you may have to search for that tiny screw you
dropped.
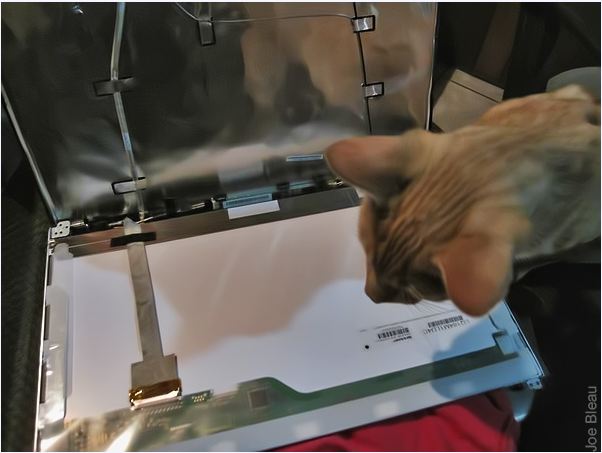
- Get your curious pets out of the room.
1- Clean working surface covered with a towel or clean rag to avoid scratching
the Precious and help catching the dropped screws.
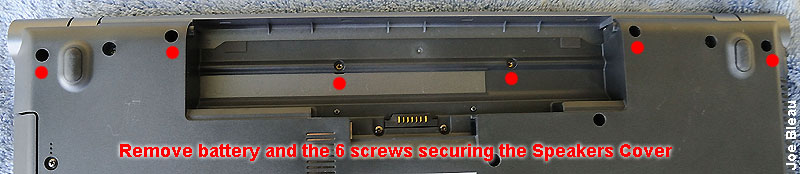
2- Unplug F, remove battery.
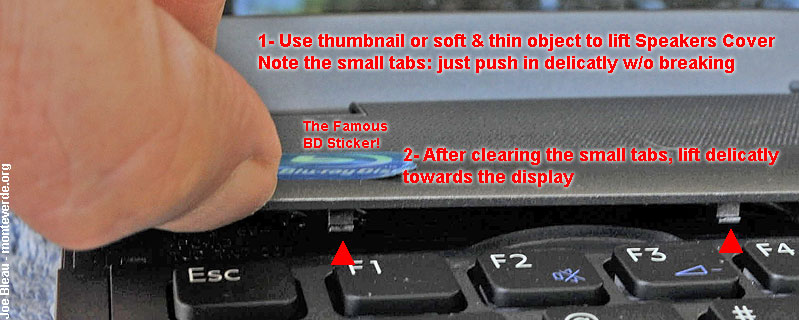
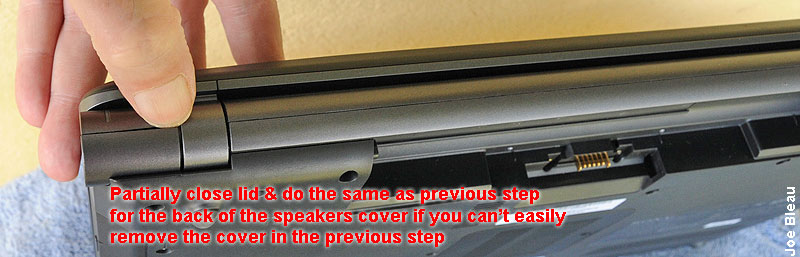
3- Remove speakers cover to gain access to the bottom bezel screws hidden under
the small square rubber covers.
4- Remove the 2 screws hidden under the extreme left & right top round rubbers
on the front LCD bezel & insert fingers with the nails facing the screen to snap
off the top of bezel & about half way down on the sides. The rubbers are held in
place by a thin two sided adhesive, not by a notch so careful not to touch the
underside so not to loose stickiness. Don't launch them into space like in the
video @ 1:46!
You can use a piece of carton as a snowshoe under your nails to spread the
pressure on the display's surface or a microfiber cloth (as used w/ eyeglasses
or lenses) to prevent scratches or fingerprints. Check video @ 2:17 for
unsnapping bezel technique but do only half way down on the sides. He is pretty
careless with the LCD's surface as it's probably not his.
If
removing a broken LCD then who cares.
The PITA steps:
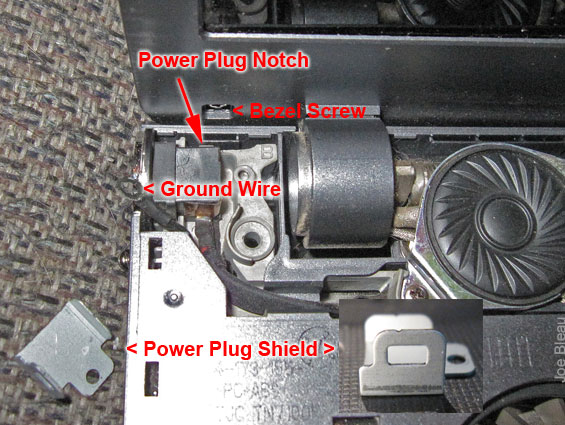
5- I used the small & alcohol cleaned jeweler's screwdrivers to partially remove
the square rubbers & catch them with the point on the adhesive part. Even with
the speakers cover removed and the lid tipped towards me, there was no working
space for the screwdriver on the left screw so I had to remove the ground wire &
shield witch did not want to come out. After wiggling it with gradual
application of force & exasperation, it finally came loose (swearing helped I
guess). I discovered once out that there was a notch securing it in place.
 So push it
toward the LCD to clear the notch.
So push it
toward the LCD to clear the notch.

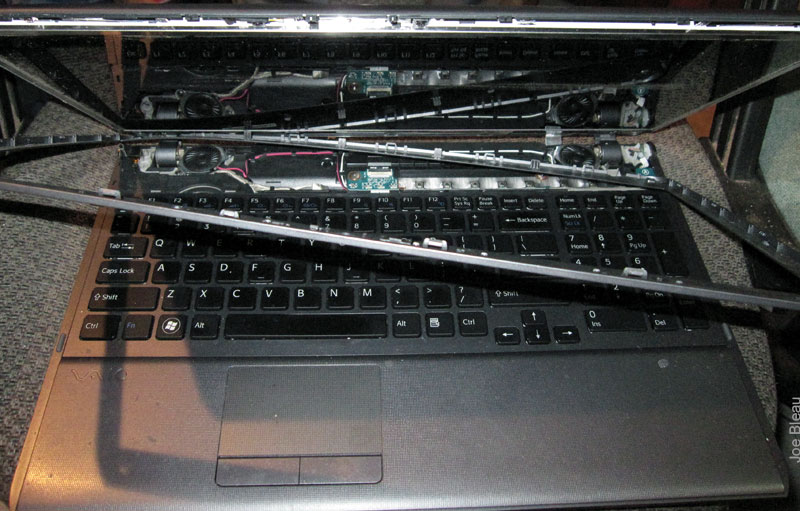
6- Complete the unsnapping of the bezel. It will be necessary to tip the lid
towards you a lot to wiggle clear & pull out the bezel, especially for the left
bottom corner. Be patient & don't break those tabs nor scratch the LCD. It would
take too many words (many of them mature & in several languages) to try to
describe all the pushing & shoving needed to take out that @#$%&!!! bezel. Watch
out for those speakers, are they covered?
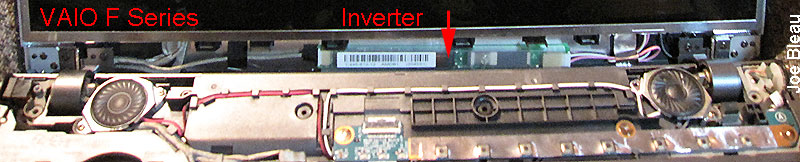
7- Finally the bezel is off. To remove and replace the inverter only is very
easy as it's only snapped in & easy to unplug. The VAIO F Series 900p & 1080p
glossy are using a CCFL (Cold
Cathode Fluorescent Lamp) tube for backlighting so it's a CCFL inverter. The
matte Premium 1080p as reported by some F users could be a 2 CCFL tubes so using
a different inverter or even LED. As I write this we don't know which F models
would use LED, again you would have to physically check or call Sony parts to
find out.

So that's the inverter's number for my US 1080p: 1-445-672-12 AMDB1 (2045S1). It could be a different model for 900p or Matte 1080p displays. You have to physically check yours before ordering.
Searching using 1-445-672-12 returns several results. Searching w/o the dashes on servicesplus.us.sony.biz returns this part for $63: 144567212.
8- To remove and replace the LCD, there is no screws on the top as
the bezel screws doubled as screen fasteners. There are only 4 screws in the
bottom, 2 on each side, easy to remove. Then put a rag or something on the
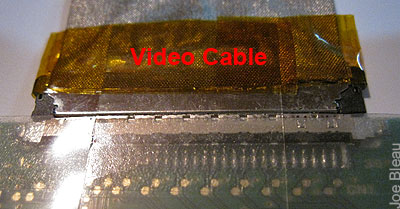
keyboard and lower the LCD on it to expose the back & video cable. Unplug
carefully the LCD's video cable as shown in the how-to video & remove the outer
metal frame if you must use it on your LCD replacement. Note the inverter model
& shape of the video cable, make sure they fit on your replacement LCD if it's
not an identical model # & brand.
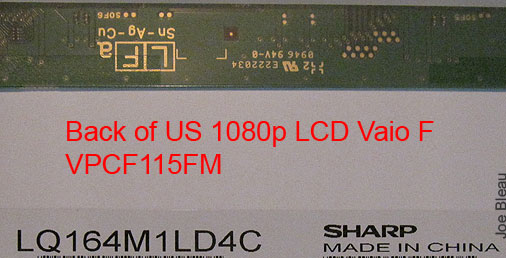
The model number behind my F screen:
Reassembly is easy, just reverse steps. Bezel is much easier to snap back than
to remove. It took me much more time to write this post than to do the thing.
Next time, if there is one, I'll make a video instead.
Hope this helps somebody. Fell free to give me some rep by clicking on the weird
looking icon on the left of this post.

Price search for aftermarket US 1080p:
SHARP LQ164M1LD4C or try this general search:
LQ164M1LD4C.
Sony_parts US > Advanced Search > type:
VPCF in the "Model Prefix
Starts with" box > hit Search: et voilà! 4 pages of part results.
I did not search this Sony_parts site, could be useful:
https://servicesales.sel.sony.com/ec.../web/index.jsp
Now user roweraay cracked his F11 LCD, followed this DIY guide & decided to replace it with a VAIO FW glossy Dual-CCFL "X-BRITE Full-HD" screen as well as the corresponding inverter that needs to feed the 2 CCFL tubes. Per his post here:
Resolution: 1920 x 1080
Lighting: 2-CCFL
Contrast: 700
Brightness: 375 cd/m2
Viewing Angle: (up/down/left/right) (70/70/50/60).
Pixel Pitch: 0.189 x 0.189
Dimensions: 375 x 221.1 x 7.0
Pins: 30 pin
Manufacturer: SHARP
Manufacturer Part#: LQ164M1LA4A
He reported that the FW screen was much better than his OEM F 1080p US LCD.
The down side: he bought the OEM FW inverter for $99.61
here. A reseller of LQ164M1LA4A should also have the inverter for half that
price or less.
>>> If somebody finds the brand & model number for the Vaio_VPCF
EU Premium
matte 1080p LCD 2 CCFL with 100% coverage of the Adobe RGB color space, please
PM me!
@ EU F owners: ignore our previous requests for a photo of the back of
your Premium LCD's. Eventually the model # will be published or found & it's too
much work and damage to the bezel risk unless you have an other reason the remove the display.
------------------------------------------------------------------------------------------------------------------------------
Vaio F Series Monitor Calibration and Users Created Profiles Roundup

--------------------------------------------------------------------------------------------------
Vaio F Series Windows 7 64-bit Clean Install Guide Using OEM Recovery Discs
------------------------------------------------------------------------------------------------------------------------------------------------
How to Replace the Hard Drive (HDD) of a VAIO VPCF Series Laptop
--------------------------------------------------------------------------------------------
How to install a secondary hard drive in the optical drive bay of a VAIO VPCF Series
-----------------------------------------------------------------------------------------------------
Vaio F Series - How To Replace the Keyboard & Clean the Fan

-------------------------------------------------------------------------------------------------------
How To Guides for the Vaio F Series: |
Clean Install using the
OEM Recovery Discs |
Calibrate the Monitor |
Replace the Display
and/or the Inverter |
Replace The
Keyboard or Clean the Fan |
Add a
Secondary Hard Drive |
Replace the Main Hard
Drive | VAIO
F Series Disassembly Guide - Teardown |
3rd Party
Battery: $70/4 hours Battery Life!
![]()
You can contribute to the VaioFSeries.com mini-site I'm currently building by clicking
Joe Bleau's avatars:
![]()
![]()
![]()
![]()
![]()
![]()
![]()
![]()
![]()