How To Guides for the Vaio F Series: |
Clean Install using the
OEM Recovery Discs |
Calibrate the Monitor |
Replace the Display
and/or the Inverter |
Replace The
Keyboard or Clean the Fan |
Add a
Secondary Hard Drive |
Replace the Main Hard
Drive | VAIO
F Series Disassembly Guide - Teardown |
3rd Party
Battery: $70/4 hours Battery Life!
![]()
How to install a secondary hard drive in the optical drive bay of a VAIO VPCF Series
|
Linking to this page: if you can, please use keywords in your links to help search engines results & use the normal URL found in the status bar of your browsers. Exception: forum.notebookreview.com (NBR) broke all links to the How-To articles hosted on this site by breaking all links starting with monteverde.org. If you want to link to this page on NBR, copy, paste & post this as a workaround: [URL="http://tinyurl.com/2v88hs3"]How to install a secondary hard drive in the optical drive bay of a VAIO_VPCF Series[/URL] Note: if you don't put an underscore between comercial words like Vaio F or F Series or Acer, etc, then NBR automatically parse the words with links to their coupons pages & break the intended links. Hence the Vaio_F. I can't do individual support but if
you want to write to make suggestions or comments about this page or
just say Hello or thanks, please write to:
All the Vaio F content found here is in the process of being moved to this new dedicated mini-site: www.vaiofseries.com |
Updated 2012-09-18: I have been using both the caddy and external DVD enclosure since 2 years with zero problems. New products links added.
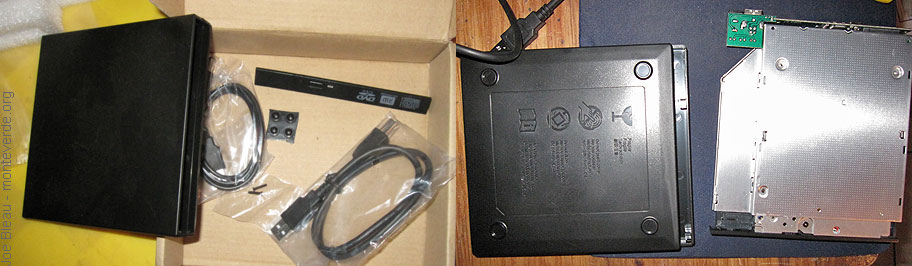
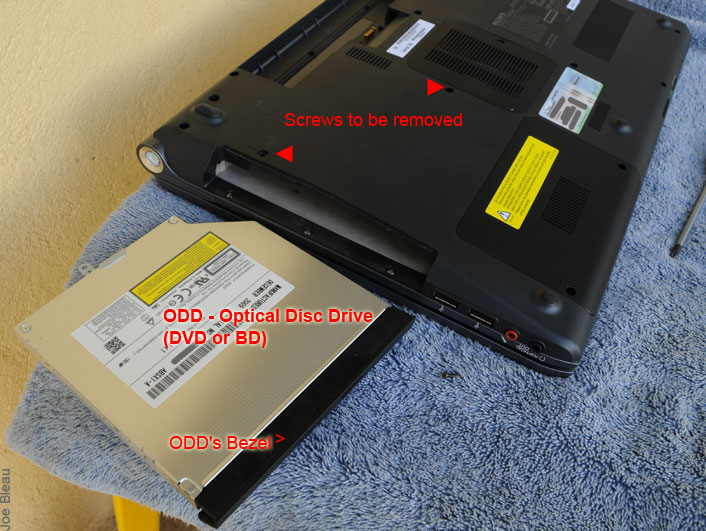
The VAIO VPCF or VAIO F Series does not have a secondary hard drive option or a dedicated bay for adding one. A simple DIY solution is to replace the Optical Disc Drive (ODD) with a hard disk drive (HDD) caddy and use the ODD in an external ODD enclosure.
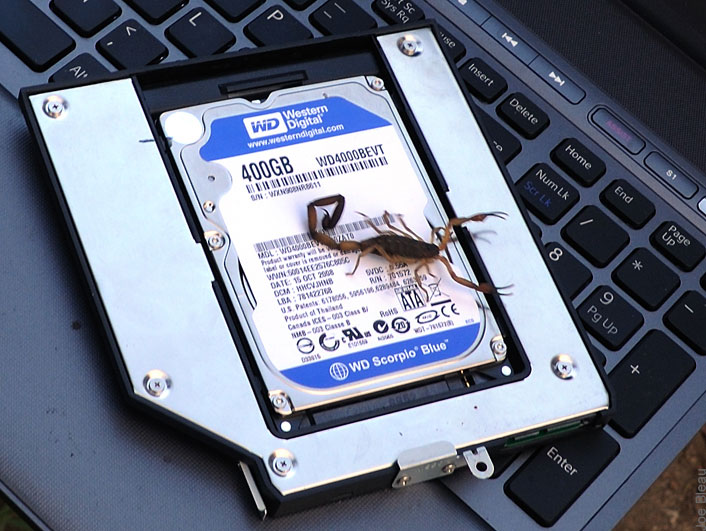
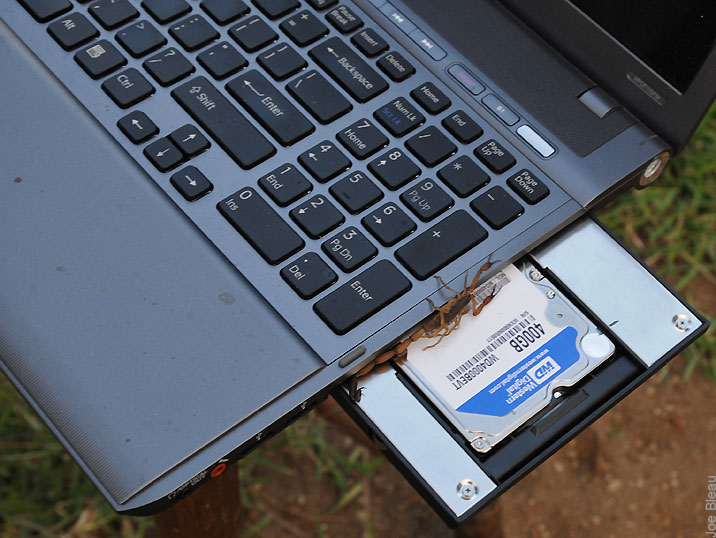
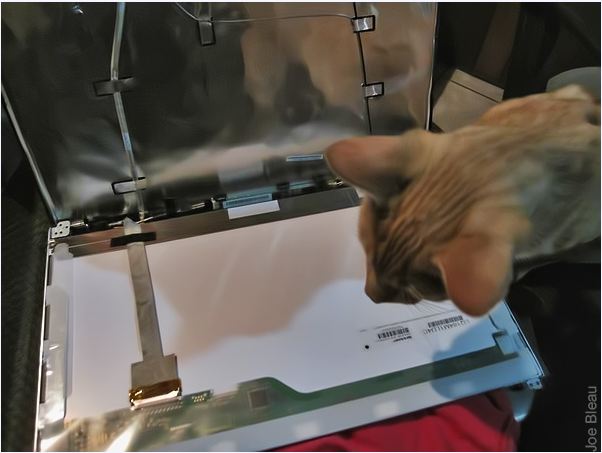
| Just when I was getting ready to take some photos of the
HDD caddy, I notice my two teenage cats getting pretty excited less than a meter
from me: they were playing "who's the quickest" with a scorpion swinging |
Pros:
- More onboard storage @ the fast SATA read/write rates.
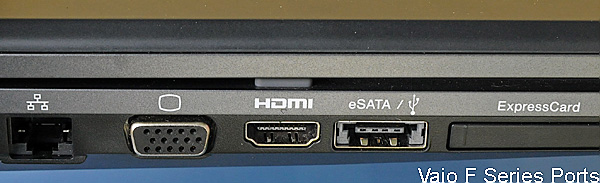
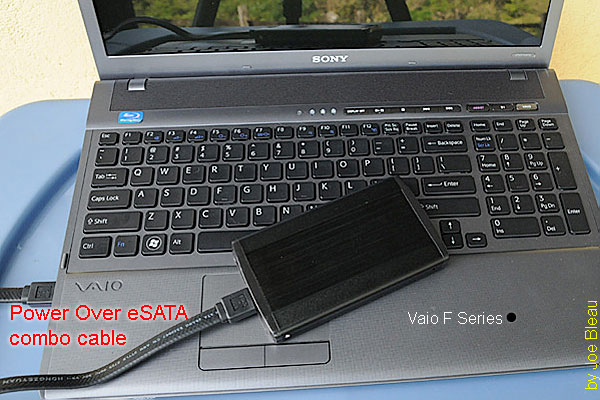
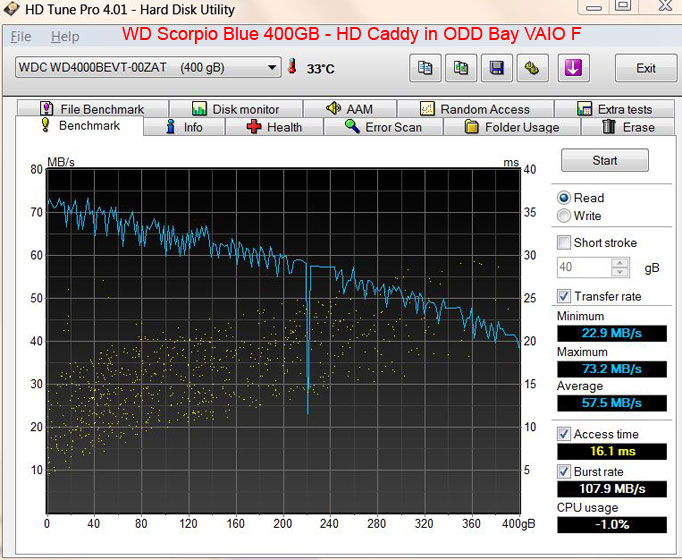
- Faster transfer rates compared to an external USB 2.0 HDD enclosure as the benchmarks below illustrate but similar to an ext. HDD connected via the eSATA/USB two-in-one port found on the VAIO F Series either via: 1- a regular eSATA cable or 2- a special eSATA/USB combo cable & enclosure compatible with Power Over eSATA. Works only with 2.5" HDD's, 3.5" need their own A/C power source and a regular eSATA cable).
- Less bulk for transportation compared to an external HDD enclosure if you don't need to carry the ODD enclosure.
- Faster video editing with OS, software & Temp files on C: and original footage on the secondary HDD. Same gains when using as a fast scratch disk for Photoshop, etc.
- Secondary HDD can be used in conjunction with SSD as primary drive
- Much more useful for me than a ODD which I rarely use anymore.
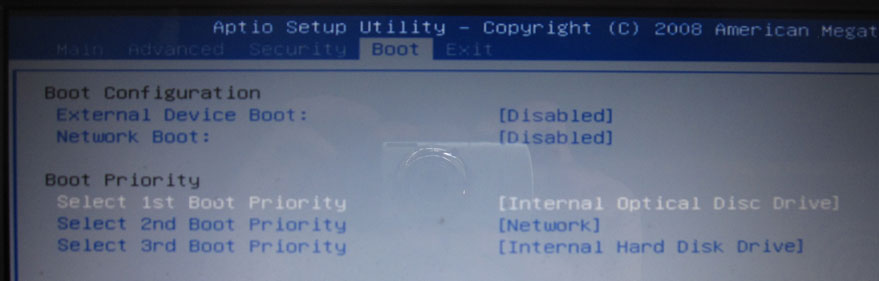
- The VAIO F can be booted from an external USB device including an external ODD enclosure. Just select booting order in BIOS (F2 when booting).
Cons:
- Higher power consumption & the battery life may be shorten by 20 minutes or more if the secondary HDD is not disabled via Device Manager when not needed. Note that the HDD in ODD bay consumes less than an external HDD powered by the notebook via USB or Power Over eSATA.
- More data to backup & a greater loss if notebook is lost or stolen.
- Additional HDD produces some extra heat but it's easily handled by the fan and natural cooling so the notebook does not get any hotter. The HDD in ODD bay runs constantly 5c cooler than the main drive on my Vaio F and no extra heat can be felt above the Number keypad.
- Notebook gets very slightly heavier, I will post weight gain compared to the stock ODD. It's not significant.
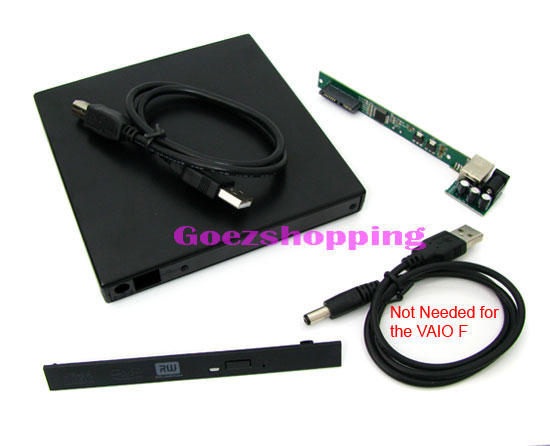
- You need to buy an external ODD (CD, DVD) SATA enclosure with a USB cable. You can find one on ebay using these keywords: usb 12.7mm sata cd enclosure ($15 including shipping worldwide as of 2012-09-18). Note that the single USB data/power cable works with the F, the included additional USB/rounded connector power only cable cable in the box was not needed for me but could come handy when connecting to an other laptop with lower USB power output. The included driver disc was not needed as the VPCF11 recognized it immediately. I ripped 7 cd's in a row using that enclosure & it never failed nor overheated.
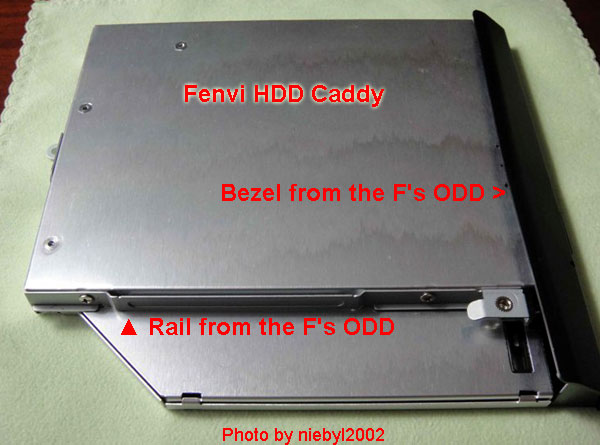
- The special shaped Sony F ODD bezel does not fit on all HDD caddy's but fits perfectly on the "fenvi" and "HDD" branded caddy as illustrated below.
- It can be annoying to connect & disconnect the ODD enclosure if you use it often and if using a USB hub, it must be powered or you need a 5v 1a power adapter if all your VAIO F USBs are used up.
---------------------
There are 4 criteria for finding an HDD caddy for the ODD bay that will fit in an VAIO F Series laptop:
1- External shape must be similar to the ODD with a thickness of 12.7mm which is the thickness of the OEM ODD.
2- Caddy to laptop interface must be SATA in the case of the VAIO F.
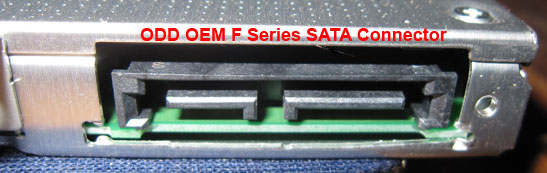
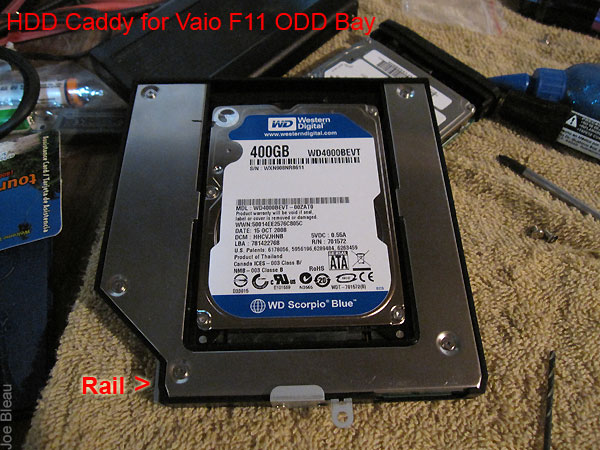
3- Caddy to HDD (or SSD) interface must fit the HDD you intend to use in the caddy: SATA or older PATA (IDE). Since I upgraded the onboard HDD to a 7200rpm, the caddy is to be used with the old OEM HDD wich has a SATA interface, same as the WD Scorpio Blue shown in the photos above who was extracted from a WD Passport USB enclosure. WD now welds a proprietary interface to prevent people from using their enclosure drives like I did so search the web with your exact WD enclosure model before atempting that.
4- This is optional but if you want your F to look the same as with the OEM ODD in it then the caddy must have slots for mounting the ODD's bezel which is easy to remove as described below. So if you buy a caddy with removable faceplate then you will be able to use the Vaio DVD player's faceplate.
-----------------------
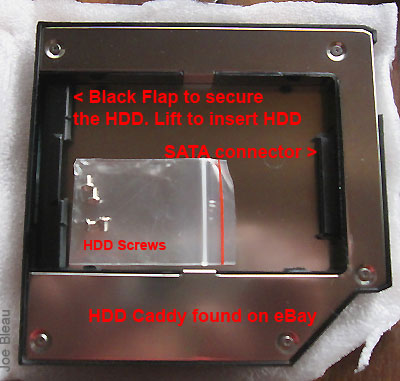
As of 2012-09-18 several Vaio F users reported a
perfect fit on no need to drill holes for the bracket and rails with the
caddy found here or search ebay with these words
12.7mm caddy SATA TO SATA from other sellers and make sure it lookes
the same: inner black plastic to snap in the HDD using it's screws,
removable face plate and has "HDD" on the bottom right sticker. See
photo >>>
ebay with these words
12.7mm caddy SATA TO SATA from other sellers and make sure it lookes
the same: inner black plastic to snap in the HDD using it's screws,
removable face plate and has "HDD" on the bottom right sticker. See
photo >>>
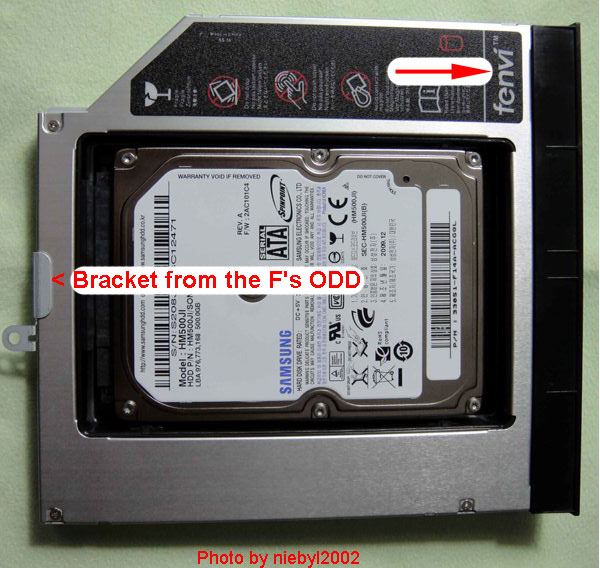
niebyl2002 reported here that he found a "fenvi" 12.7mm thick branded caddy that fits perfectly the F & includes mounting slots for the bezel: "...The whole caddy is made out of aluminium. Every single necessary hole is pre-drilled* and the most important part front panel is swappable. Everything is perfect fit. No wiggling no forcing. Once you're done laptop looks still OEM".
*Not a big problem but both above lack bottom holes for securing the HDD with screws. It's probably overkill but I added one as I travel on very bumpy roads and don't want the HDD to move around. They do not have an HDD activity LED but that's just a detail. An easy fit for the OEM ODD bezel is a big plus!

**********
NOT recommended: This
Optical Bay Hard Drive Caddy(p/n OBHD-SATA-SATA-B) Black, 12.7mm from
newmodeUS fits in the Vaio F in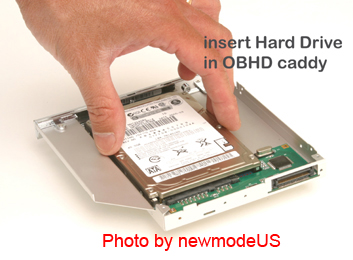 conjunction with a 2.5" SATA HDD. Same model
with a chrome bezel
here. I did not get that one because it was $42 + $8.64 to ship to Costa
Rica or $5 to USA for example. Add to cart then in cart: estimate shipping. They
posted a how-to video on Youtube
here & it looks pretty
flimsy IMO.
conjunction with a 2.5" SATA HDD. Same model
with a chrome bezel
here. I did not get that one because it was $42 + $8.64 to ship to Costa
Rica or $5 to USA for example. Add to cart then in cart: estimate shipping. They
posted a how-to video on Youtube
here & it looks pretty
flimsy IMO.
Note: MelodyMaster reported here that the F's bezel does not fit on this model w/o some modifications while njss reported the opposite here with some how-to install the bezel photos.

The steps missing in the newmodeUS how-to video for the VAIO VPCF:
- There are 2 screws to remove the ODD from the F, not only one.
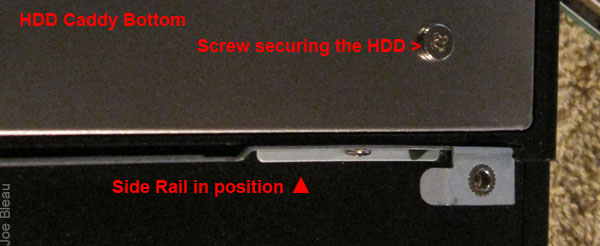
- You need to remove the side rail on the ODD to screw it on the HDD caddy.
- The already installed on the caddy flat bezel will not fit flush with the F's body & you need remove the bezel from the OEM ODD and use the provided adapter to install the F's bezel on the caddy.
- Note the fade out/in @ 3:12, my guess is that they edited out the trouble the guy had inserting the thing. :-)
*************
Two years ago I got my older model HDD caddy on eBay instead for $15 including international shipping vs. $50.64 above. But if I would do it again, I would get the "HDD" or fenvi described above.
Pros (for the model I bought & the fenvi & "HDD"):
- Sturdy enough that it does not need a top metal cover so better ventilation & cooling than the newmodeUS model. My HHD in the bay is constantly 5c cooler than the onboard HDD.
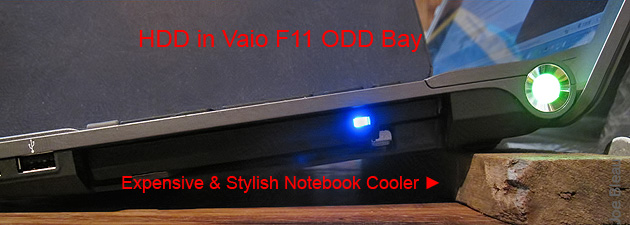
- Includes HDD activity blue LED (not on fenvi) & 4 small screws to secure the HDD.
- Includes a black plastic flap to secure the back of the HDD in the caddy.
- For fenvi and the newer "HDD" models: slots for the OEM bezel (or faceplate)
- Inexpensive.

Cons:
-
No holes in the bottom of the caddy for the screws securing the HDD nor in the back for the laptop/screw bracket nor on the side for the rail.
 But it was easy enough to drill with a
smaller bit than the screws' diameter. The material is soft enough that the
screws had no problem tapping a thread. Just don't over tighten.
But it was easy enough to drill with a
smaller bit than the screws' diameter. The material is soft enough that the
screws had no problem tapping a thread. Just don't over tighten. -
For fenvi and the newer "HDD" models: No holes in the bottom of the caddy for the screws securing the HDD but holes provided for the bracket & rail.
************************************
The How-To Steps:
Note: @ the time I ordered this caddy, only the 9.5mm thick was available which fits also in the F with an added shim. I used a small piece of dense black foam from an old mouse pad but all the steps are the same for a 12.7mm caddy which fits better.
Tools:
- Magnetized small Phillips screwdriver (crosshead). Magnetized because it's much easier to extract the screws from deep holes & reset the small screws w/o dropping them.
- Small flat screwdriver or something similar to push in a few plastic tabs if removing the bezel of the OEM ODD.
- Sharp box cutter or strong Exacto.
- Not requiered for fenvi and the newer "HDD" models: Drill & a bit a tad smaller than the included screws.
- Not requiered for fenvi and the newer "HDD" models: Permanent marker or marking paper or paint to mark location of holes to be drilled.
- Flashlight.
- Clean working surface covered with a towel or clean rag to avoid scratching the Precious and help catching the dropped screws.
Warning:
- Never touch a circuit or electrical contacts with the magnetized screwdriver's point.
- Don't work over a shaggy rug as you may have to search for that tiny screw you dropped.
- Sort removed screws by steps as they have different length, use paper note if you have a short span memory.
- Get your curious pets out of the room.
- As they say in USA: this coffee is hot and the floor is slippery and don't sue us if you try this DIY & mess up something in your notebook as you were warned: use this how-to guide @ your own risk. Note that unless you are very clumsy, it's very easy to do and it's not brain surgery.
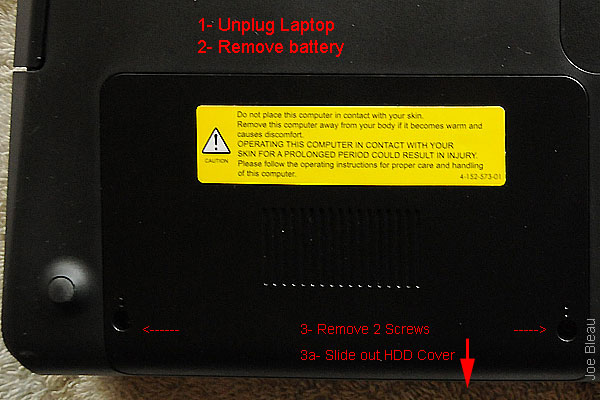
1- Unplug the laptop & remove the battery.
2- Remove the two screws securing the ODD and pull out gently.
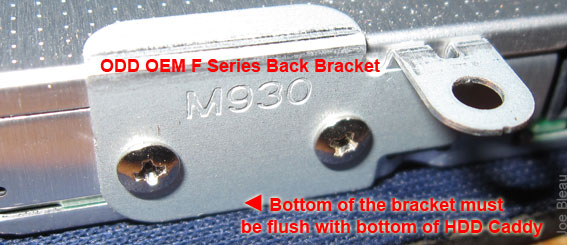
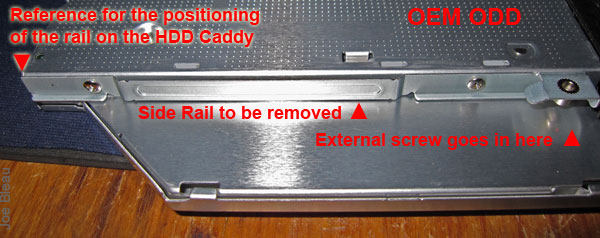
3- Compare your HDD caddy to the ODD: size, thickness, laptop SATA interface & internal HDD interface should fit the HDD you intend to use.
4- Note the position of the back bracket & the rail on the side of the ODD. They are the interface for the two screws you removed in step 2. If they are not positioned exactly the same way on the HDD caddy, you will not be able to secure the caddy to the laptop's body & mating the laptop & caddy SATA connectors will be difficult if not impossible. You could take some photos of the OEM ODD state before removing the stuff as a reference.
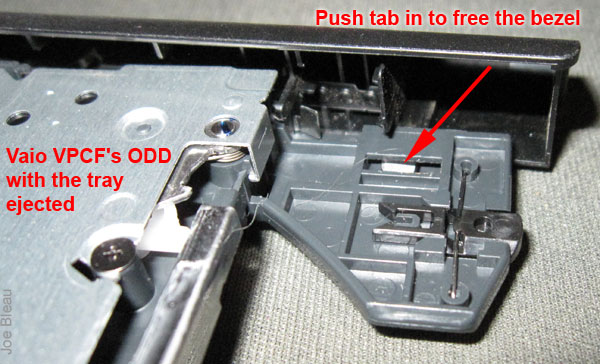
To remove the bezel from the OEM ODD: once you pulled out the F's ODD (BD or DVD
it does not matter), you can't
see the plastic tabs you need to push in to remove the bezel. You can't use the
eject button either as the optical drive is now powerless.
Unfold a paperclip (or needle, etc) & insert it in the hole next to the eject button to manually eject the disc tray.
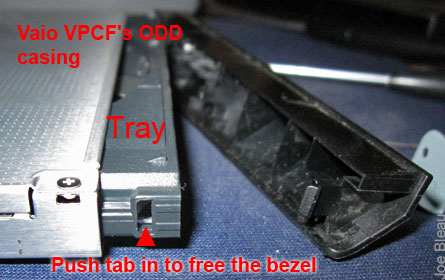
Grab the tray being careful not to touch the laser part & push gently in the tab to unclip the faceplate. There is 2 other tabs, be careful not to break them.
5- A caveat for mine but absent on the fenvi and the newer "HDD" models: : there is an extra notch on the Fleabay caddy with prevents the proper positioning of the side rail. I used the box cutter to remove it as the sides of the caddy are made a plastic. A good thing in this case. I had also to drill the 2 holes for the rear bracket & 2 more for the side rail while they are pre-drilled on the fenvi.

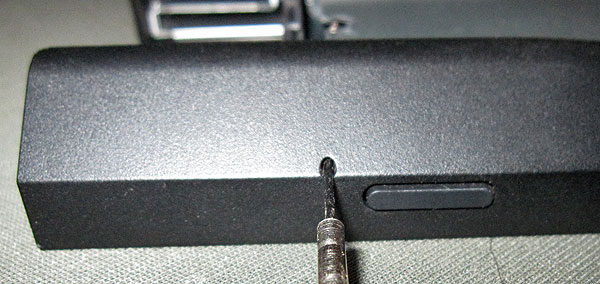
6- An other caveat (also on the fenvi and the newer "HDD" models): I don't know why they saved a few pennies by not drilling the holes in the bottom of the HDD caddy to secure the HDD in position. I installed a screw on the HDD's bottom @ the opposite end of the SATA connector, smeared the screw's head with a felt marker & before it dried up quickly inserted the HDD in the caddy and in the caddy's SATA connector & pressed the HDD to mark the position of the hole to be drilled. You can use marking paper, corrector fluid, paint, carbon paper or whatever works for you. Because the mating SATA connectors & the black flap shown above already do a good job in securing the HDD, I drilled & used only one screw & it's quite secure unless using a crowbar or something. I may drill a second hole the next time I'll be swapping HDD's.
7- For the fenvi and the newer "HDD" caddy: mount the ODD's bezel, a piece of cake. The cheap caddy needs some modifications which I will add in a couple of days (maybe).
8- Insert the HDD caddy in the F, make sure the SATA connectors properly mate. Do not use force, a bit of wiggling may be necessary and maybe some slight bending of the back bracket. Use the flashlight & looking in the external F body screw holes (Step #2) you will see the rail's female threads & the rear bracket sliding into place. Put back in the 2 screws you removed in step 2.
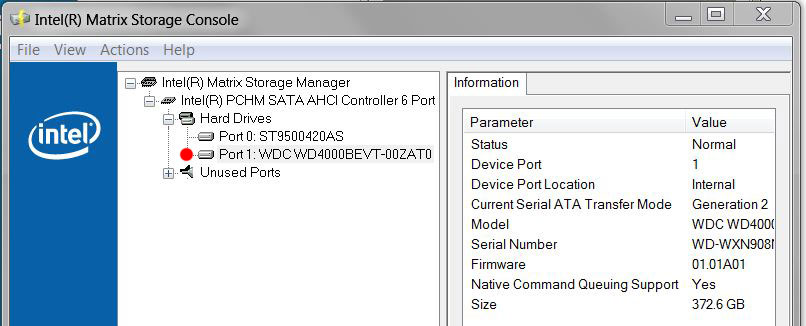
9- Et voilà! Reinstall the battery, plug the F & boot. Check with Start > search: Intel Matrix to check if all is ok (C: is on Port 0) as well as the HDD activity LED when writing/reading to that HDD, in Explorer and in Device Manager. Note: there is no LED on the fenvi and "HDD".
**********
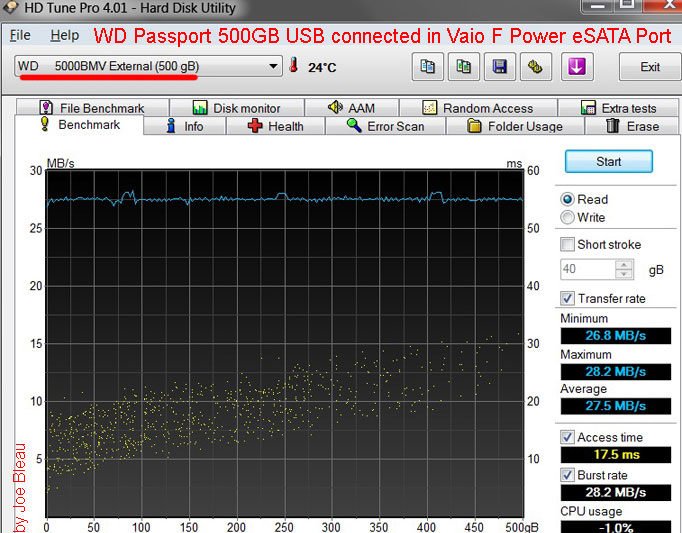
For comparison here is a benchmark for an OEM WD Passport with a similar HDD connected to the F via USB 2.0:
Edit: I just received a new 7200
rpm Seagate Momentus 500GB (took 1 month to get here in Costa Rica), can't wait
to benchmark it in the secondary HDD caddy.
![]()
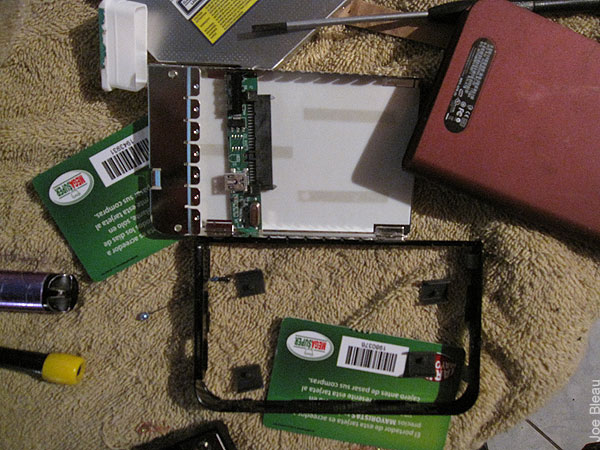
I guess I will have to put back in the WD Passport enclosure the slower 5400 rpm
400GB Scorpio Blue.
![]()
- Joe Bleau
P.S.The scorpion was released in my backyard & is probably making babies as I write this.
------------------------------------------------------------------------------------------------------------------------------------------------
Vaio F Series Windows 7 64-bit Clean Install Guide Using OEM Recovery Discs
------------------------------------------------------------------------------------------------------------------------------------------------------
How to Replace the Hard Drive (HDD) of a VAIO VPCF Series Laptop
--------------------------------------------------------------------------------------------
Vaio F Series Laptop How To Replace the LCD Display & Inverter
---------------------------------------------------------------------------------------------
Vaio F Series Monitor Calibration and Users Created Profiles Roundup

-----------------------------------------------------------------------------------------------------
Vaio F Series - How To Replace the Keyboard & Clean the Fan

-------------------------------------------------------------------------------------------------------
How To Guides for the Vaio F Series: |
Clean Install using the
OEM Recovery Discs |
Calibrate the Monitor |
Replace the Display
and/or the Inverter |
Replace The
Keyboard or Clean the Fan |
Add a
Secondary Hard Drive |
Replace the Main Hard
Drive | VAIO
F Series Disassembly Guide - Teardown |
3rd Party
Battery: $70/4 hours Battery Life!
![]()
You can contribute to the VaioFSeries.com mini-site I'm currently building by clicking
Joe Bleau's avatars:
![]()
![]()
![]()
![]()
![]()
![]()
![]()
![]()
![]()